4.0 KiB
Add relations to a Custom C# node
[!NOTE] To add logic to a node, you must create a Custom C# node and add ports. [!includevs-tasks-note-end]
After you add ports and add logic to a node, relations help Visual Scripting correctly display a Custom C# node in a Script Graph.
To add relations to a node:
-
[!includeopen-project-window]
-
[!includeopen-existing-external-code]
-
In your external editor, add relations in the format
$RelationType$($Port1$, $Port2$), where$RelationType$is the relation type you want to assign between the ports you specify as$Port1$or$Port2$.For example, to assign relations to the previous example node:
using System;
using Unity.VisualScripting;
using UnityEngine;

public class MyNode : Unit
{
[DoNotSerialize]
public ControlInput inputTrigger;

[DoNotSerialize]
public ControlOutput outputTrigger;

[DoNotSerialize]
public ValueInput myValueA;

[DoNotSerialize]
public ValueInput myValueB;

[DoNotSerialize]
public ValueOutput result;

private string resultValue;
protected override void Definition()
{
    inputTrigger = ControlInput("inputTrigger", (flow) =>
    {
        resultValue = flow.GetValue<string>(myValueA) + flow.GetValue<string>(myValueB) + "!!!";
        return outputTrigger;
    });
    outputTrigger = ControlOutput("outputTrigger");

    myValueA = ValueInput<string>("myValueA", "Hello ");
    myValueB = ValueInput<string>("myValueB", String.Empty);
    result = ValueOutput<string>("result", (flow) => resultValue);

    Requirement(myValueA, inputTrigger); //Specifies that we need the myValueA value to be set before the node can run.
    Requirement(myValueB, inputTrigger); //Specifies that we need the myValueB value to be set before the node can run.
    Succession(inputTrigger, outputTrigger); //Specifies that the input trigger port's input exits at the output trigger port. Not setting your succession also dims connected nodes, but the execution still completes.
    Assignment(inputTrigger,result);//Specifies that data is written to the result string output when the inputTrigger is triggered.
}
}
For more information on relation types, see Custom C# nodes.
-
[!includesave-script]
-
[!includereturn-unity]
-
Do one of the following:
- [!includeopen-graph-w-node].
- [!includeff-add-node]
-
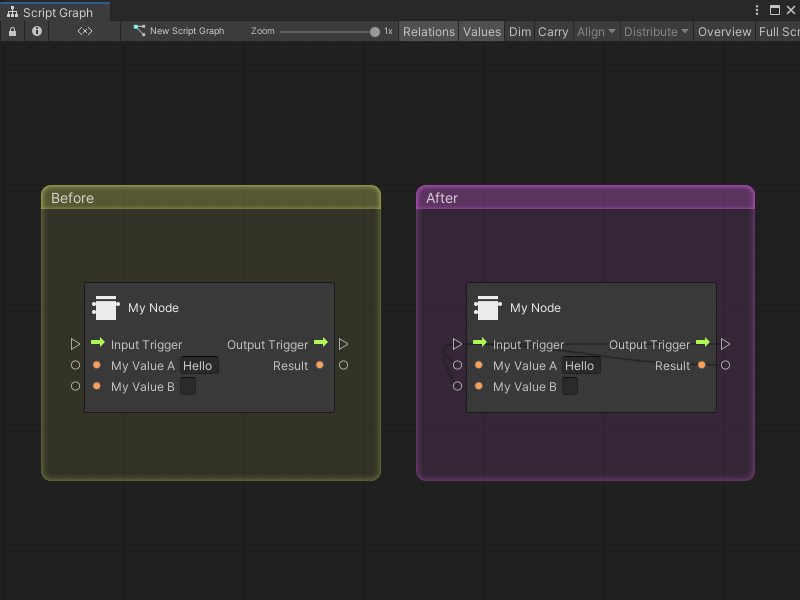
In the Graph toolbar, enable Relations.
Visual Scripting displays the relations you assigned to the Custom C# node. If you used the previous code sample, the node's relations might look like the following image:
Next steps
After you add relations to a node, you can choose to add documentation or customize the node with attributes.
